• 2 min read
  • I just picked up some new networking gear, so this will be the first of a multi-part blog post about my learnings configuring Unifi gear.

    One issue I noticed right away was that it is not possible, via CLI nor GUI, to configure fixed IP address for a host that relies on more than 1 of the configured networks/VLANs. Since I have a home server (user VLAN) that is also hosting the controller softare (management VLAN) and also acts as a gateway for sending packets over its VPN interface (VPN VLAN), this was necessary for me.

    It is possible but requires a bit of manual configuration using a config.gateway.json file. First, if you have configured a fixed IP for the host, unset it.

    Then, merge in the DHCP mappings in your config.gateway.json file:

    {
      "service":{
        "dhcp-server":{
          "shared-network-name":{
            "LAN_192.168.1.0-24":{
              "subnet":{
                "192.168.1.0/24":{
                  "static-mapping":{
                    "00-aa-22-bb-44-cc.mgmt":{
                      "ip-address":"192.168.1.5",
                      "mac-address":"00:aa:22:bb:44:cc"
                    }
                  }
                }
              }
            },
            "LAN_Users_192.168.10.0-24":{
              "subnet":{
                "192.168.10.0/24":{
                  "static-mapping":{
                    "00-aa-22-bb-44-cc.users":{
                      "ip-address":"192.168.10.5",
                      "mac-address":"00:aa:22:bb:44:cc"
                    }
                  }
                }
              }
            },
            "LAN_VPN_192.168.20.0-24":{
              "subnet":{
                "192.168.20.0/24":{
                  "static-mapping":{
                    "00-aa-22-bb-44-cc.vpn":{
                      "ip-address":"192.168.20.5",
                      "mac-address":"00:aa:22:bb:44:cc"
                    }
                  }
                }
              }
            }
          }
        }
      }
    }

    The key here is that the string child of the static-mapping node must be unique. Unifi will put in the MAC separated by dashes by default, so above I just tacked on the VLAN name to each name.

    Re-provision your USG and you should be good to go. If you run into trouble an want to debug DHCP req/ack sequences, setup verbose logging:

    configure
    set service dhcp-server global-parameters 'log-facility local2;'
    set system syslog file dhcpd facility local2 level debug
    set system syslog file dhcpd archive files 5
    set system syslog file dhcpd archive size 5000
    commit

    You’ll find the DHCP log under /var/log/user/dhcpd. Simply reboot to go back to normal logging.

  • 3 min read
  • IoT Hub is a great, scalable way to manage your IoT devices. Did you know you can trigger an Azure Function when receiving a device-to-cloud message the same way you can for an Event Hub message?

    Building the Event Hub connection string

    Every IoT hub offers a read-only Event Hub-compatible endpoint that can be used with normal Event Hub consumers. This includes Azure Functions, which provides an Event Hub trigger.

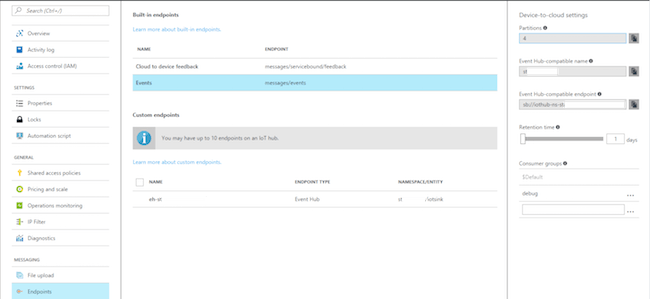
    You can view your IoT Hub’s Event Hub-compatible by opening your IoT Hub resource in the Azure portal and navigating to the Endpoints blade, then clicking the Events (messages/events) endpoint. You will find the Event Hub-compatible name, and Event Hub-compatible endpoint (in the format of sb://iothub-ns-foo.servicebus.windows.net/) - keep note of these for later.

    IoT Hub - Access Policy

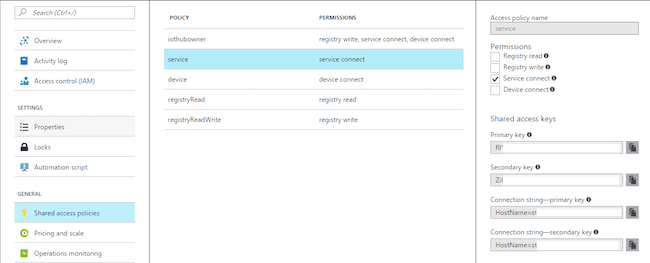
    Next, navigate to the IoT hub’s Shared Access Policies blade. You will need to either use one of the existing policies or add your own, and the policy you choose must have the Service connect permission. Click any policy to view its associated primary key.

    IoT Hub - Access Policy

    Now, we can use these four pieces of information to construct an Event Hub connection string, which follows the format Endpoint=sb://EH_COMPATIBLE_ENDPOINT;EntityPath=EH_COMPATIBLE_NAME;SharedAccessKeyNa‌​me=IOTHUB_POLICY_NAME;Share‌​dAccessKey=IOTHUB_POLICY_KEY.

    Configuring Azure Functions

    We will now setup an Azure Function with a trigger using the Event Hub-compatible information.

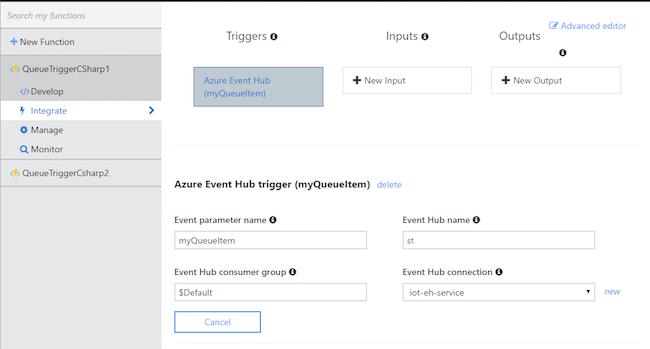
    Open the Azure Function resource and switch to the Integrate tab. Add a new trigger and choose Event Hub, which will reveal the following settings page:

    Azure Functions - Trigger configuration

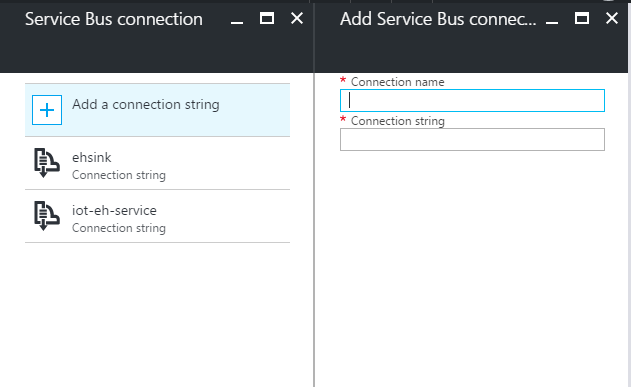
    Enter the Event Hub-compatible name collected from IoT Hub earlier under Event Hub name and then press new to enter the Event Hub connection string derived earlier.

    Azure Functions - Configure connection string

    Lastly, we need to add code under the Develop tab with a parameter that matches the Event parameter name field, so use the following:

    using System;
    
    public static void Run(string myEventHubMessage, TraceWriter log)
    {
        log.Info($"C# Queue trigger function processed: {myEventHubMessage}");
    }

    Testing the connection

    Under the Function’s Develop tab, click the Logs button from the toolbar to open the execution log. Next, send a cloud-to-device message — if you haven’t setup a device, simple_sample_device.js from the IoT Hub Node.js SDK does nicely.

    After sending your message, you should see that your Function triggered successfully.

    What about in ARM templates?

    This manual setup is fine for testing, but what about automation for when moving to production?

    ARM templates provide a reference() function that resolves a resource’s runtime state. It’s perfect for obtaining the Event Hub-compatible name that was provisioned as it was created:

        ...
        "parameters": {
            "iotHubName": {
                "defaultValue": "iothub2functions",
                "type": "String"
            }
        },
        "variables": {
            "iotHubApiVersion": "2016-02-03",
            "iotHubPolicyName": "service"
        },
        "outputs": {
            "eventHubConnectionString": {
                "type": "string",
                "value": "[concat('Endpoint=',reference(resourceId('Microsoft.Devices/IoTHubs',parameters('iotHubName'))).eventHubEndpoints.events.endpoint,';EntityPath=',reference(resourceId('Microsoft.Devices/IoTHubs',parameters('iotHubName'))).eventHubEndpoints.events.path,';SharedAccessKeyName=',variables('iotHubPolicyName'),';SharedAccessKey=',listKeys(resourceId('Microsoft.Devices/IotHubs/Iothubkeys', parameters('iotHubName'),variables('iotHubPolicyName')), variables('iotHubApiVersion')).primaryKey)]"
            }
        },
        ...
  • 5 min read
  • The Skype for Business App SDK and Skype Web SDK are great ways to build the unified communication experience provided by the Skype for Business (previously Lync) server directly into web and mobile applications and deliver new interactive and collaborative experiences into your application.

    If you’re getting started with the Skype SDKs and/or Office 365 for the first time, the documentation available on the The Skype Developer Platform is a great place to start, but there are a number of steps you’ll need to work through before coding.

    In this post, I’ll detail how to get setup with Skype for Business Online (Office 365) using a developer tenant and get coding as quickly as possible. As well, this is a good time to note that that at this time, some features of the SDKs are in preview. More features are coming out with every release!

    Good to know: compatibility & platform features

    As of writing (Jan. 2017), both the App SDK and Web SDK support connecting to on-premise and online (via Office 365) deployments.

    However, at this time there are some important distinctions between the capabilities of the SDKs on the two platforms and in compatibility with O365 vs on-premise for meeting join. These differences will be rounded out in future SDK releases (for details on roadmap, see the Andrew Bybee’s Ignite 2016 talk).

    App SDK

    The App SDK is available for iOS and Android apps, and supports the unauthenticated workflow. Meeting join, IM and audio-video communication is possible but done anonymously, using only a meeting link. There is no opportunity for a user to sign-in, so tasks like contact management are not available.

    Web SDK

    Contrary to the App SDK, the Web SDK has better support for authenticated workflows. Contact management, 1:1 conversations and more is available from the Web SDK after the user has authenticated. Anonymous meeting join, where the end-user joins a conference without signing in, is available but only when connecting to on-premise Skype for Business deployments at this time.

    It’s also important to note that both Chrome and Firefox have announced the deprecation of NPAPI plugins, which prevents the use of the Skype for Business Web App Plug-In. As such, audio-video functionality will be limited in Chrome and Firefox at this time.

    IE11 and Safari both work with the web plug-in, and Edge supports A/V calling without any plugins via its built-in ORTC stack.

    Setup an Office developer tenant

    In order to get started, you’ll need to be an administrator on Office 365 tenant and have 2-3 users that are licensed with Skype for Business. If you do not already have such an account, sign up at dev.office.com/devprogram to obtain a free Office developer account.

    Once your account is activated, visit portal.office.com, click the Admin tile, then add 2-3 users and assign them a developer license.

    App SDK

    If you intent to build a mobile app, you are now ready to go - all you need is your app and a meeting link! Check out the meeting join samples for Android and iOS, and the App SDK documentation

    You can generate a meeting link using the Skype for Business integration with Outlook, the desktop clients or the Lync Web Scheduler. To create them programtically, use the UCWA API. Meeting links follow the format https://meet.lync.com/tenant_name/organizer_username/meeting_id.

    Web SDK

    Because the Web SDK supports authenticated workflows, it requires some additional setup in order to authenticate users against Azure AD.

    Creating an Azure AD Application

    Registering an application will allow the Web SDK to perform OAuth authentication aginst users in an Azure AD directory. Previously, managing Azure AD applications required delving into the classic portal (instructions here) but fortunately Azure AD management is now available (in preview) in the new portal:

    1. Go to portal.azure.com

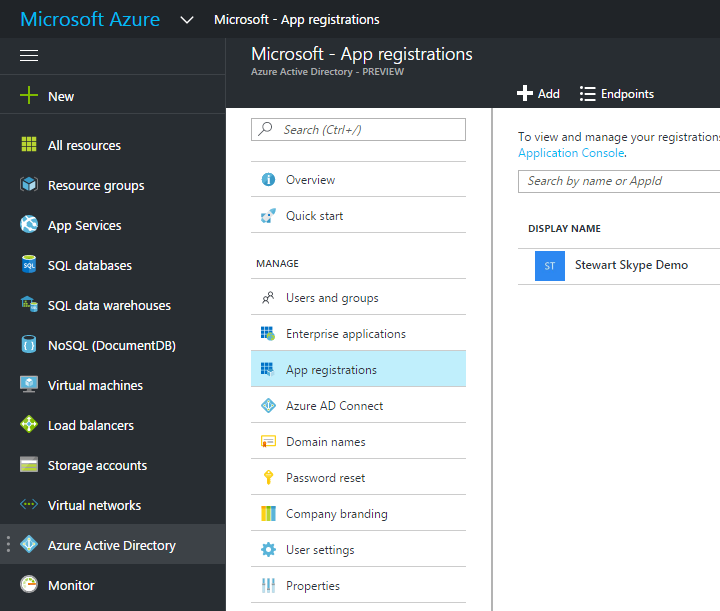
    2. Select Azure Active Directory > App registrations > Add Azure Portal - AAD

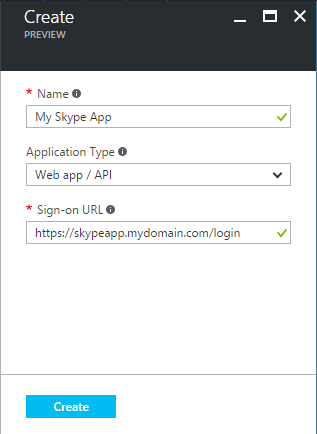
    3. Choose a human-readable name for your application and a unique sign-on URL. If unsure, use something like https://tenantID.onmicrosoft.com/appname - you can change it later once you move to production. Leave the type as Web app / API.

      Azure Portal - AAD - Create

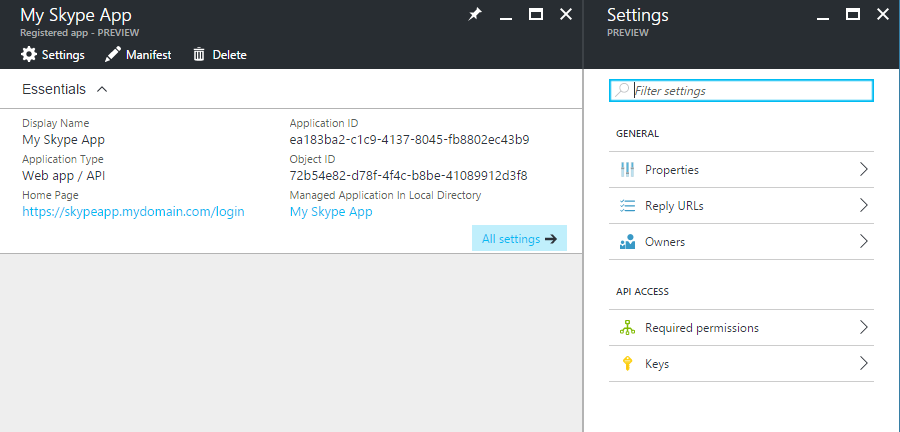
    4. Select the Manifest button to open the manifest editor:

      Azure Portal - AAD - Manage

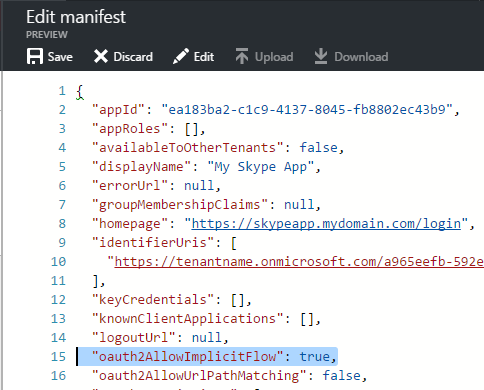
      Then set oauth2AllowImplicitFlow is set to true:

      Azure Portal - AAD - Manifest

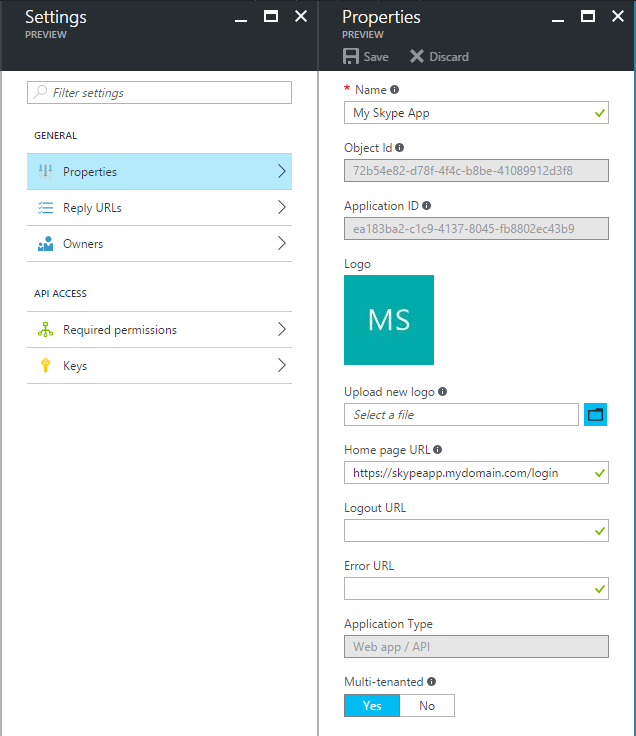
    5. Next, navigate to the application’s Properties blade and change Multi-tenanted to Yes. This will ensure that people outside of your Office tenant can use this application.

      Enabling multi-tenantancy on the application

    6. Navigate to the Reply URLs blade and enter the URLs at which your application will be hosted. Note that while developing your application, adding http://localhost is convinient but be aware that it means anyone who stands up their own site on http://localhost and knows your client ID can authenticate against your application. Tread carefully!

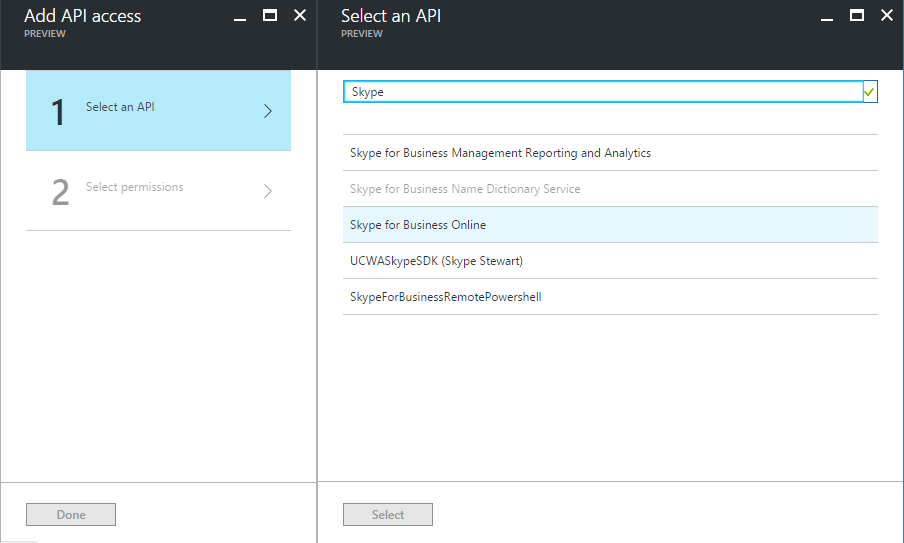
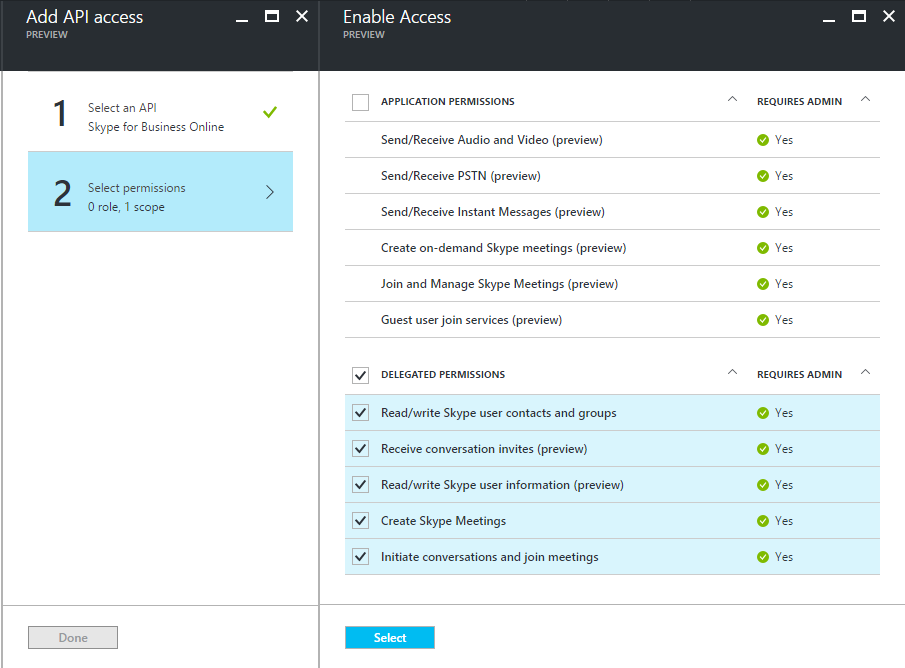
    7. Navigate to the Required Permissions blade and add delegated permissions for Skype for Business Online:

      Azure Portal - AAD - Permissions

      Azure Portal - AAD - Permissions 2

    That’s it - your application is now configured. However before it can authenticate users with the Web SDK, you must consent to the application using an admin user from your Office tenant. Open a In-Private/Incognito browsing window and visit this URL, replacing both CLIENT_ID and REDIRECT_URI as configured above: https://login.microsoftonline.com/common/oauth2/authorize?response_type=id_token&client_id=CLIENT_ID&redirect_uri=https://REDIRECT_URI&response_mode=form_post&nonce=…&resource=https://webdir.online.lync.com&prompt=admin_consent

    Now check out the Web SDK documentation try running the Web SDK samples, or use the interactive Web SDK sample.

  • 2 min read
  • I’m writing this quick post at the end of 2016 to wish everyone happy holidays and let you know about some changes coming in 2017.

    Employment

    Earlier this year, I stopped working for my company Diffingo Solutions Inc. and am excited to say that I now work at Microsoft, as can be seen on my github profile (@stewartadam). I think that the direction Microsoft has taken in the past two years has been very positive and I’m exicted to see what the future brings.

    Of course, there’s the mandatory note: the opinions on this blog are my own and may not represent those of my employer. However, given the technologies I interact with on a day-to-day basis, you may notice an increase in blog posts about technologies owned by my employer ;)

    Comments are now disabled

    As well, due to an influx of spam comments that are bypassing CAPTCHA and other automated anti-spam methods, I have disabled comments on my blog. I expect this will be the case for the forseeable future.

    New blog style coming

    I am likely going to convert my Drupal-based blog to one based on Markdown or other static rendering. Drupal has been great to me, but Markdown is so much easier to author in and requires 0 maintenance. As well, the rate at which I can author content has slowed so Drupal’s original use case for me (maintaining Views-based lists of the various categories of howtos I was writing) no longer applies.

  • 10 min read
  • Introduction

    Steam has a great (albeit, a little glitchy) feature called In-Home Streaming that allows you to stream games from running Steam clients on your local network, effectively turning your gaming PC into a little render farm and allowing you to play from low-power devices like a laptop.

    With the help of OpenVPN, it's possible to enable playback of games from your home PC seamlessly while away from your home network too, provided you have a decent Internet connection. This tutorial will demonstrate how to setup an OpenVPN server on Fedora 23 with a bridged network connection in let you VPN into your home network and stream Steam games from PCs on your LAN.

    To make this work, we need to use OpenVPN in bridged mode with a tap network device. Bridging the ethernet and tap interfaces will allow VPN clients to receive an IP address on the LAN's subnet.

    The default (and simpler) tun devices are not bridged, and function on a separate subnet - something which will break in-home streaming. We need to be on the same LAN so that the UDP broadcast packets sent by Steam for auto-discovery will be received by the VPN clients.

    Creating a network bridge

    Let's start by setting up the network bridge with NetworkManager and enslaving the ethernet interface. Check the name of your active network interface by running nmcli d, and replace the value ofETH_IFACE with that name below:

    ETH_IFACE=enp3s0
    nmcli con add type bridge ifname br0
    nmcli c modify bridge-br0 bridge.stp no
    nmcli con add type bridge-slave ifname $ETH_IFACE master bridge-br0
    nmcli c up "bridge-slave-${ETH_IFACE}"
    nmcli c up bridge-br0

    Installing the OpenVPN server

    Next, in order to run an OpenVPN server, one needs to set up a certificate authority (CA) signs client certificates and authorizes them for login. In our case, we'll be using password authentication (for convenience) -- but OpenVPN still wants a CA setup and the server's certificate signed. Let's set up the CA for the OpenVPN server:

    dnf install easy-rsa
    cp -a /usr/share/easy-rsa/3 /root/openvpn-bridged-rsa
    cd /root/openvpn-bridged-rsa
    ./easyrsa init-pki
    ./easyrsa build-ca
    # Enter the CA password, then accept the defaults

    Now we need to create and sign the certificate for the server (set the value of SERVER_ALIAS to an alias of your choice):

    SERVER_ALIAS=homelab
    ./easyrsa gen-dh
    ./easyrsa gen-req $SERVER_ALIAS nopass
    ./easyrsa sign-req server $SERVER_ALIAS
    # Enter 'yes', then CA password

    Finally, we copy the keys and certificates to a dedicated folder for OpenVPN:

    mkdir /etc/openvpn/keys
    chmod 700 /etc/openvpn/keys
    cp pki/ca.crt pki/dh.pem "pki/issued/${SERVER_ALIAS}.crt" "pki/private/${SERVER_ALIAS}.key" /etc/openvpn/keys

    We are now ready to configure OpenVPN. Set the variables based on your LAN's configuration (see ifconfig $ETH_IFACE output if unsure):

    BRIDGE_IP=192.168.1.1
    NETMASK=255.255.255.0
    IP_POOL_START=192.168.1.241
    IP_POOL_END=192.168.1.254

    dnf install openvpn
    firewall-cmd --permanent --add-service openvpn
    firewall-cmd --reload

    cat << EOF > /etc/openvpn/bridged.conf
    port 1194
    dev tap0
    tls-server
    ca /etc/openvpn/keys/ca.crt
    cert /etc/openvpn/keys/$SERVER_ALIAS.crt
    key /etc/openvpn/keys/$SERVER_ALIAS.key # This file should be kept secret
    dh /etc/openvpn/keys/dh.pem
    server-bridge $BRIDGE_IP $NETMASK $IP_POOL_START $IP_POOL_END

    # Password authentication
    client-cert-not-required
    username-as-common-name
    plugin /usr/lib64/openvpn/plugins/openvpn-plugin-auth-pam.so openvpn

    # Allow multiple client connections from the same user
    duplicate-cn

    # Client should attempt reconnection on link failure.
    keepalive 10 120

    # The server doesn't need root privileges
    user openvpn
    group openvpn

    # Logging levels & prevent repeated messages
    verb 4
    mute 20
    log-append /var/log/openvpn.log
    status /var/log/openvpn-status.log

    # Set some other options
    comp-lzo
    persist-key
    persist-tun
    push persist-key
    push persist-tun

    # Brings up tap0 since NetworkManager won't do it automatically (yet?)
    script-security 2
    up up.sh
    EOF

    OpenVPN will create the tap0 interface automatically when the OpenVPN server starts. NetworkManager is able to enslave the interface to the bridge, but won't bring tap0 online. For that, we install a simple script:

    cat << EOF > /etc/openvpn/up.sh
    #!/bin/bash
    br=br0
    dev=\$1
    mtu=\$2
    link_mtu=\$3
    local_ip=\$4
    local_netmask=\$5

    # This should be done by NetworkManager... but it can't hurt.
    /sbin/brctl addif \$br \$dev

    # NetworkManager appears to be capable of enslaving tap0 to the bridge automatically, but won't bring up the interface.
    /sbin/ifconfig \$dev 0.0.0.0 promisc up
    EOF
    chmod +x /etc/openvpn/up.sh

    Next, we need to create the PAM authentication configuration file for the OpenVPN password plugin:

    cat << EOF > /etc/pam.d/openvpn
    #%PAM-1.0
    auth       substack     system-auth
    auth       include      postlogin
    auth       requisite    pam_succeed_if.so user ingroup openvpn_pw quiet
    account    required     pam_nologin.so
    account    include      system-auth
    password   include      system-auth
    EOF

    This configuration file requires that the users logging in be a member of the openvpn_pw group. You can adjust the file as you see fit.

    Finally open the OpenVPN port in the firewall and start the service:

    firewall-cmd --permanent --add-service openvpn
    firewall-cmd --reload
    systemctl enable openvpn@bridged
    systemctl start openvpn@bridged

    Configure the firewall

    By default, packets are filtered through iptables which can cause issues, as packets won't freely through between the interfaces. We can disable that behavior:

    cat << EOF > /etc/modules-load.d/bridge.conf
    br_netfilter
    EOF

    cat << EOF > /etc/sysctl.d/bridge.conf
    net.bridge.bridge-nf-call-ip6tables=0
    net.bridge.bridge-nf-call-iptables=0
    net.bridge.bridge-nf-call-arptables=0
    EOF
    sysctl -p /etc/sysctl.d/bridge.conf

    cat << EOF > /etc/udev/rules.d/99-bridge.rules
    ACTION=="add", SUBSYSTEM=="module", KERNEL=="br_netfilter", RUN+="/sbin/sysctl -p /etc/sysctl.d/bridge.conf"
    EOF

    Note that I assume that net.ipv4.ip_forward=1 (having libvirt seems to configure this automatically). If not, you'll want to tune the sysctl parameter net.ipv4.ip_forward to a value of 1.

    OpenVPN client configuration

    That's it! Send a copy of /etc/openvpn/keys/ca.crt on the server to your clients, and you should now be able to connect to your OpenVPN server using this very simple client configuration (don't forget to replace your.server.fqdn with your server's IP address or FQDN):

    client
    dev tap
    proto udp
    remote your.server.fqdn 1194
    resolv-retry infinite
    nobind
    persist-key
    persist-tun
    ca ca.crt
    auth-user-pass
    comp-lzo
    verb 3
    mute 20

    Once connected, you should be able to ping any machine on the LAN as well as fire up Stream for a remote gaming session.

    Appendix A: Steam on OS X

    Small note, if you're running the Steam client on OS X there's a bug where the client only sends its UDP broadcast packets for in-home streaming discovery on the machine's primary (i.e. Ethernet or Wi-FI) interface. This nifty command captures those and re-broadcasts them over the VPN's interface (once again, substitute the value of BROADCAST_ADDR per your LAN settings):

    BROADCAST_ADDR=192.168.1.255
    sudo tshark -T fields -e data -l 'udp and dst port 27036' | script -q /dev/null xxd -r -p | socat - UDP-DATAGRAM:${BROADCAST_ADDR}:27036,broadcast

    Special thanks to Larry Land for pointing that out in his blog post Run your own high-end cloud gaming service on EC2 (which is awesome and deserves a read, by the way).

    The above command requires the Wireshark and socat utilities to be installed, which you can grab using homebrew:

    brew install wireshark socat

    and if you don't know your subnet's broadcast address, verify it with:

    ifconfig tap0 | grep broadcast

    Appendix B: Troubleshooting tips

    Whenever possible, I like to use the most modern tooling available. This tends to bite me because documentation might not be as good or the feature set in the replacement tools might be lacking compared to the older tried and true tooling, but I try to always look forward. 'new' tooling like systemd, NetworkManager and firewalld might be rough around the edges, but I like modern feature set and consistency they bring. Most importantly, using them (instead of dropping various custom shell scripts here and there) feels a lot less like my server is held together with glue, which I like.

    While trying different configurations, I discovered a few tricks or debugging commands that proved very useful to me - particularly while migrating commands from online resources intended for the older tooling to the tools mentioned above. Hopefully, you'll find them useful too!

    It's always the firewall

    The blame for most of the issues you will experience generally fall under firewall or routing issues.

    First steps in testing should always be disabling the firewall (systemctl stop firewalld) and if that doesn't fix it, then move to checking the routes (route -n or netstat -rn).
    If you've identified the firewall is to blame, re-enable it and identifying the root cause by adjusting your configuration while listening for packets to see when packets start flowing again.

    Listening for packets

    This will be your most used tool. If things don't go as expected, listen on each of the tap0 (client), tap0 (server) and br0 (server) interfaces and then generate some traffic to see how far the packets:

    tcpdump -i IFNAME PATTERN

    where PATTERN can select for hosts, ports or traffic type. In this case, a particular favorite of mine was icmp or udp port 27036 as this let me test by trying to ping a machine on the LAN from the VPN client, as well as see if the Steam UDP traffic was making it in/out.

    Send UDP traffic

    The iperf utility can be used to test if UDP traffic makes it to the OpenVPN server (run iperf -c server.ip -u -T 32 -t 3 -i 1 -p 27036) from the OpenVPN clients/LAN machines (run iperf -s -u -i 1 -p 27036).

    Changing the zone of an interface

    firewalld has different 'zones', each with different rules (see firewall-cmd --list-all-zones). Interfaces will have the rules from the default zone applied to them unless otherwise configured, which you can do as follows:

    firewall-cmd --permanent --change-interface=IFNAME --zone=NEW_ZONE
    firewall-cmd --reload

    Adding raw IPTables rules to firewalld

    e.g. to accept all packet forwarding on the bridge interface:

    firewall-cmd --permanent --direct --add-rule ipv4 filter FORWARD 0 -i br0 -j ACCEPT

    or to allow all packets flowing over br0 and tap0:

    firewall-cmd --permanent --direct --add-rule ipv4 filter INPUT 0 -i tap0 -j ACCEPT
    firewall-cmd --permanent --direct --add-rule ipv4 filter INPUT 0 -i br0 -j ACCEPT

    Neither of these commands should be necessary given the netfilter sysctl parameters tweaked earlier, but certain OpenVPN options (such as client2client) change the packet flow and cause packets to flow over the interface, get filters, then re-injected which could cause them to suddenly be affected by the iptables rules.

    Recall that firewall-cmd --reload needs to be called before the permanent rules will take effect.

    Debugging IPTables

    The default iptables -L listing isn't very helpful when inserting/deleting rules by their chain offset. The following command lists all rules, numerically, and displays line numbers:

    iptables --line-numbers -L -n -v

    You can also log dropped packets for further troubleshooting (here limited to 1/s, inserted at position 15 which was the position before the DROP rules on my machine):

    iptables -I INPUT 15 -j LOG -m limit --limit 60/min --log-prefix "iptables dropped: " --log-level 4

    Configuring a client VPN connection using only NetworkManager

    VPN_IFNAME=homelab
    nmcli c add type vpn ifname $VPN_IFNAME vpn-type openvpn
    nmcli c modify $VPN_IFNAME
    set vpn.data dev = tap
    set vpn.data ca = /path/to/copy/of/ca.crt
    set vpn.data connection-type = password
    set vpn.data remote = your.server.fqdn
    set vpn.data comp-lzo = yes
    set vpn.data username = your_user
    set vpn.data connection-type = password
    set vpn.secrets password = your_pw

    'waiting for password' when connecting using Tunnelblock

    When I was attempting to test my VPN connections using Tunnelblick on OS X, I experienced an annoying bug: When trying to connect, Tunnelblick would enter a 'Waiting for password' state, but never 'get' the password nor prompt for one. Log were misleading:

    Tunnelblick: Obtained VPN username and password from the Keychain

    No VPN password was stored in my keychain (verified using Keychain Access.app). Fortunately, this post on the Sophos community forums correctly identified the issue as a bug after having copied/renamed a Tunnelblick connection.

    Tunnelblick's preference file needs to be adjusted in order to correctly prompt for a password again:

    # from https://community.sophos.com/products/xg-firewall/f/124/t/75819
    conname="homelab"
    defaults delete net.tunnelblick.tunnelblick "${conname}-keychainHasPrivateKey"
    defaults delete net.tunnelblick.tunnelblick "${conname}-keychainHasUsername"
    defaults delete net.tunnelblick.tunnelblick "${conname}-keychainHasUsernameAndPassword"

    Additional reading